Importing Custom Datasets
You can import your own datasets into CRUX using the ‘Import Data’ module.
Where do I start?
I want to create clinical annotation files files to enable survival analysis / virtual cohort creation / enrichment analysis (must already have mutation data prepared)
Step 1: Preparing your mutation data
There are several ways to import your own data into CRUX.
Use the table below to identify the most convenient method depending on your starting point.
Input Filetype |
Required Formatting |
|---|---|
MAF |
Directly Supported: Import Straight to CRUX |
ANNOVAR (TSV) |
Directly Supported: Import Straight to CRUX |
VCFs [2-sample, unannotated] |
|
VCFs [2-sample, vep-annotated] |
|
SOLID GFF3 |
|
Complete Genomics (TSV) |
|
Complete Genomics (masterVar) |
Option 1: Import MAF file
In recent times, the MAF file format has become a popular, tabular way of storing mutational data. It is the format used by the genomic data commons that houses public TCGA and PCAWG data.
CRUX supports direct import of MAF files.
MAF files can be quite large, but CRUX requires only a small subset of the possible columns:
Column Name |
Description |
Valid Values |
|---|---|---|
Tumor_Sample_Barcode |
Sample Identifier |
Alphanumeric |
Hugo_Symbol |
Gene Name (from HUGO consortium) |
Alphanumeric |
Chromosome |
Chromosome |
Alphanumeric |
Start_Position |
Mutation Start (1-based) |
Numeric |
End_Position |
Mutation End (1-based) |
Numeric |
Reference_Allele |
Reference Allele |
A,C,T,G (variable length) |
Tumor_Seq_Allele2 |
Alt Allele (present in tumour) |
A,C,T,G (variable length) |
Variant_Classification |
Translational effect of variant allele |
See here GPT(CROSS link to Variant_Classifications data dictionary section) |
Variant_Type |
Type of mutation |
SNP,DNP,TNP,ONP,INS,DEL,Consolidated |
If you have a MAF file, you can Import it directly into CRUX
Example MAF file:
APL_primary_and_relapse.maf
Option 2: Create and Import ANNOVAR annotation files
Annovar is a widely used tool for annotating the impact of genomic variants. It is a standard part of many bioinformatics pipelines.
Annovar input is tabular, and includes various annotation columns, only a small subset is required for reading to work correctly.
Required Columns:
Column Name |
Description |
Valid Values |
|---|---|---|
Chr |
Chromosome |
e.g., 1, 2, X, Y |
Start |
Start position |
Integer |
End |
End position |
Integer |
Ref |
Reference allele |
Single base or indel |
Alt |
Alternate allele |
Single base or indel |
Func.refGene OR Func.ensGene |
Functional annotation |
String |
Gene.refGene OR Gene.ensGene |
Gene symbol |
String |
GeneDetail.refGene OR GeneDetail.ensGene |
Gene details |
String |
ExonicFunc.refGene OR ExonicFunc.ensGene |
Exonic function annotation |
String |
AAChange.refGene OR AAChange.ensGene |
Amino acid change annotation |
String |
If you already have an ANNOVAR annotation file you can Import it directly into CRUX
Example Annovar file:
demo_annovar.txt
Q: Ho do I get an ANNOVAR annotated file?
To obtain an ANNOVAR annotated file, you can either request your bioinformatics team to run it for you, or manually perform the annotation without programming using the process documented below.
Creating ANNOVAR files (Using only Graphical Interfaces)
Supported Starting Filetypes |
|---|
VCFs (Single Sample) |
VCFs (2-sample, tumor-normal) [1] |
SOLID GFF3 |
Complete Genomics TSV |
Complete Genomics masterVar |
Warning
For large cohorts (>10 samples) manually running ANNOVAR on each single/two-sample VCF is repetitive and time consuming.
Modern analysis pipelines typically output either ANNOVAR files whch can be directly imported to CRUX or VEP-annotated VCFs which can be converted to MAFs all at once using the INTERCHANGE web app.
Please consider asking whoever runs your analysis pipelines if either ANNOVAR or VEP-annotated files are available.
Visit wAnnovar
Input your files (and select the matched Input Format from the dropdown)
Example VCFConfigure Paramaters
Choose an appropriate reference genome.
Select the relevant input format (e.g. VCF if you’ve uploaded a vcf file)
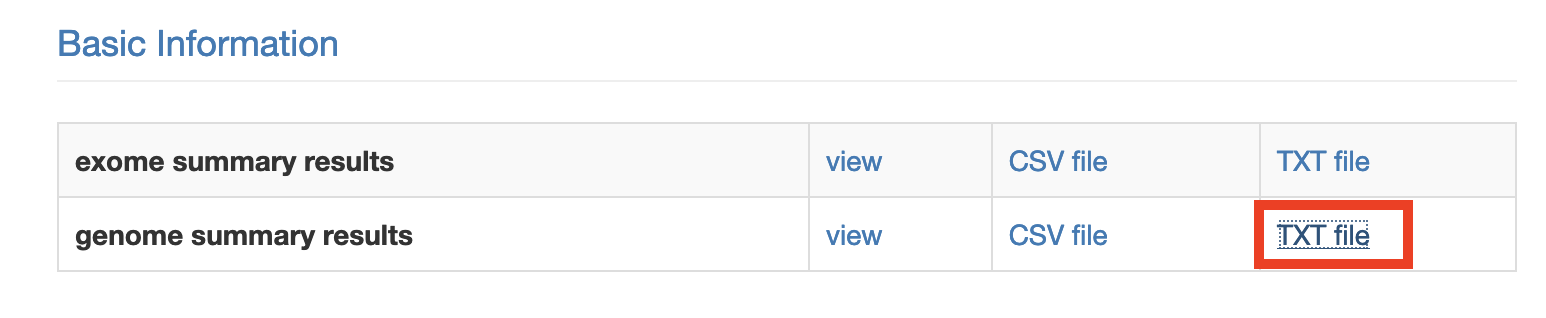
Leave the remaining settings as default (see screenshot below for expected values)

Download annovar (TXT) file (genome summary results). Clicking the link will open the annotation file in a new tab. Hit ctrl/command + S to download this file.
Repeat for each single sample VCF (or other input files) in your cohort
Import annovar files into CRUX

Creating ANNOVAR files (for bioinformaticians)
We reccomend using the following settings when performing commandline annotation of annovar
table_annovar.pl example/ex1.avinput humandb/ -buildver hg19 -out myanno -remove -protocol (refGene),cytoBand,dbnsfp30a -operation (g),r,f -nastring NA
Note
CRUX will attempt to auto-detect as much as possible about the features of your annovar annotation. It requires that annovar was run with gene based annotation as a first operation, before including any filter or region based annotations. Please be aware that the CRUX annovar parser performs no transcript prioritization.
Option 3: Convert VCFs To MAF using Interchange
Note
To maximise accessibility, this section describes how to convert VCFs to MAF files using web apps only (no coding).
If you are comfortable working on the commandline we reccomend trying vcf2maf
Interchange is the easiest way to convert vep-annotated VCFs into cohort MAF files compatible with CRUX.
If you have unannotated VCFs, please first annotate with VEP as described here
Once you have VEP-annotated VCFs head to the Interchange Web App and select VCF to MAF conversion
Then select all your VCF files as pictured below

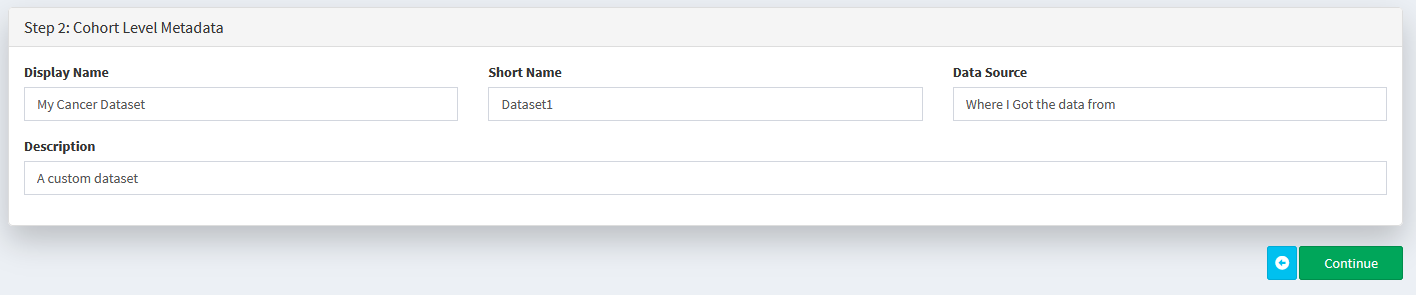
Fill in the metadata about your cohort in the step2: panel.
You may need to alter the expected ID of tumour samples/normal samples to match your VCFs. Most somatic variant callers used in tumor-normal pipelines produce 2-sample vcfs with the tumour sample named ‘TUMOR’ and the normal sample named ‘NORMAL’. This is what the interchange vcf2maf converter expects. If your VCFs differ from this (you can open vcfs in a text editor to check this) then you may need to change it. If tumour sample name in your VCF changes from one sample to another, please check ‘Assume IDs in VCF match Tumor Sample Barcodes’
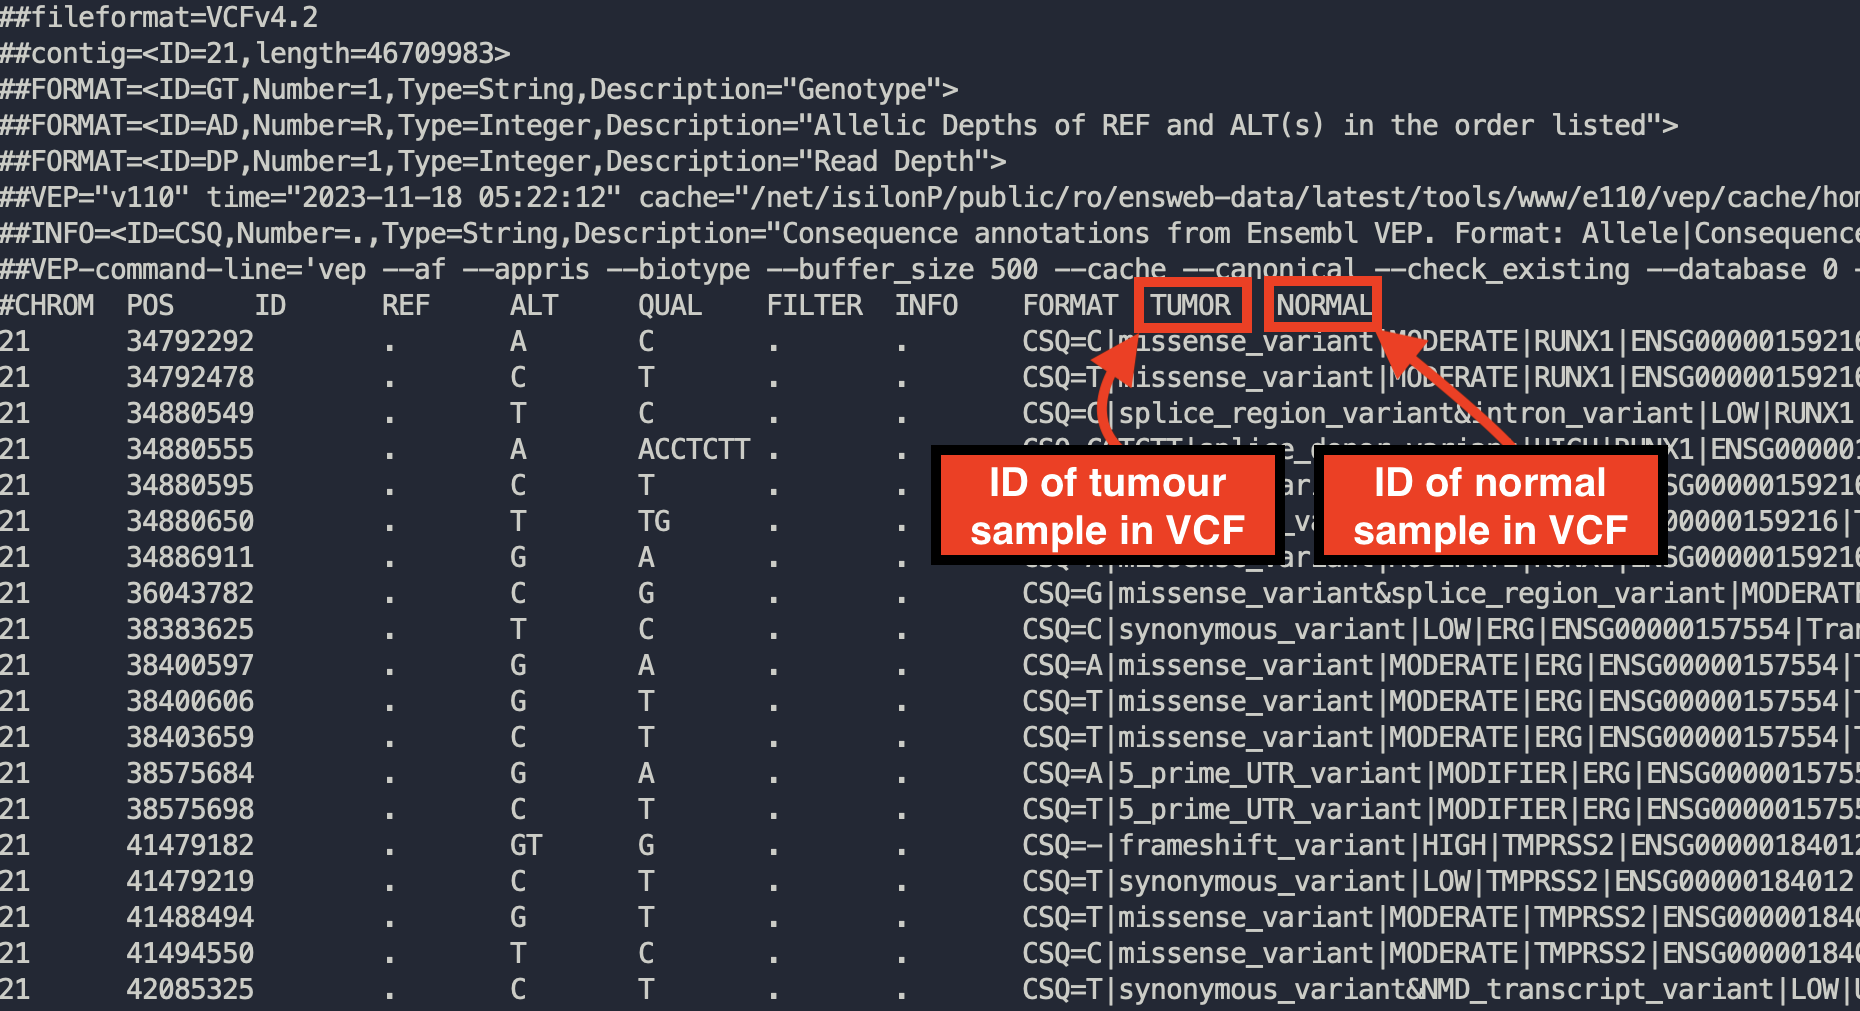
Example of opening up a VCF to checking how tumor and normal samples are named
Check the VCF file -> Tumour Name Mappings and Interchange correctly guesses the appropriate sample name for each file. You can manually change these sample names if required.
Finally, click convert to download your MAF file.
Step 2: Prepare Clinical Annotation Files
In addition to loading your mutation data, CRUX supports optional import of any clinical annotations. If you have any sample-level data, e.g. disease subtype, patient gender, or age, we reccomend importing these so that they can be added to visualisations, used to define virtual cohorts, and to facilitate study of the relationships between clinical annotations and mutational profile
The clinical annotations file must be a tsv/csv with a header row. It must contain a ‘Tumor_Sample_Barcode’ column containing sample IDs that match the Tumor_Sample_Barcode column of your mutation file.
You can then add as many columns where each column represents a variable.
For example:
Tumor_Sample_Barcode |
Disease_Subtype |
Gender |
|---|---|---|
sample1 |
Subtype1 |
Female |
sample2 |
Subtype1 |
Male |
sample3 |
Subtype2 |
Male |
sample5 |
Subtype2 |
Male |
The file you’d actually import would be example.csv
Survival Analysis
To identify genetic biomarkers of good / poor survival you need to include survival data in your clinical annotation file. Two columns are required:
days_to_last_followup
vital_status (1=dead; 0=alive)
Step 3: Importing your dataset into CRUX
If you want to look at your own data in CRUX, prepare your file in MAF/ANNOVAR format as described above then import it using the ‘Import Data’ module

Optionally import any sample level metadata (an example file can be downloaded and opened using excel). Please see the Prepare Clinical Annoation Files section for details.

Choose a name and description for your dataset (all fields must be filled in to continue)
Add the dataset to our data pool

You should now be able to select your dataset for use in any of the analysis/visualisation modules

Annotating Variants with VEP (Graphical tools only)
Navigate to VEP and create a new job
Ensure the chosen ‘Assembly’ is appropriate. If your variants are called based on hg38/GRCh38 reference genomes the link above is appropriate. If your pipelines use hg19/GRCh37 reference genomes you’ll need to use the GRCh37 version
Upload your VCF
Configure Vep with the following settings
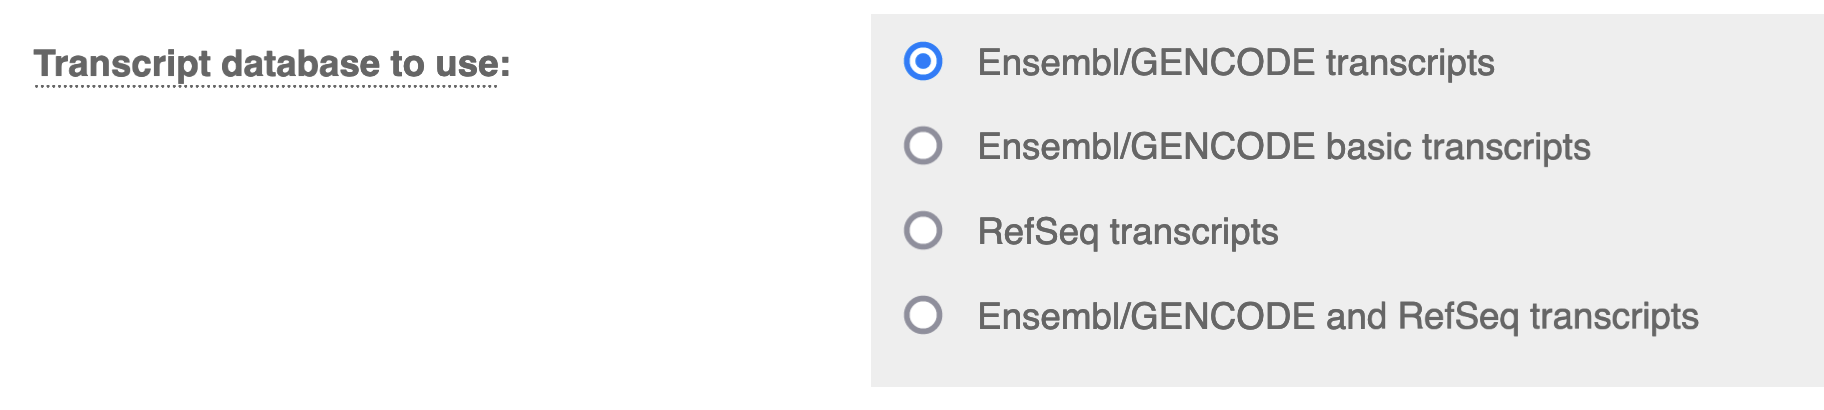
Transcript Database to Use: Ensembl/GENCODE transcripts.
Note
You can use other transcript databases so long as you ensure consistency between the VCFs in your cohort (and any other cohort you want to compare results to)
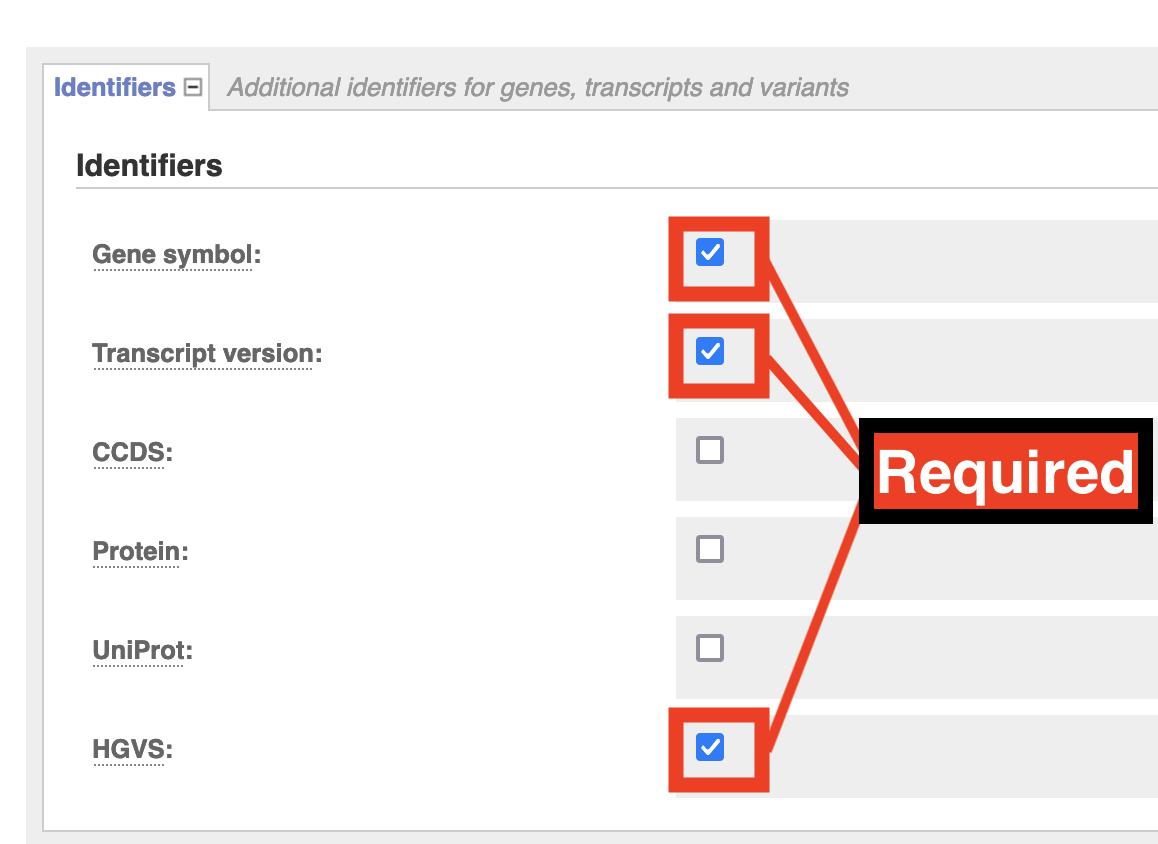
Identifiers: Check Gene Symbol & Transcript Version & HGVS
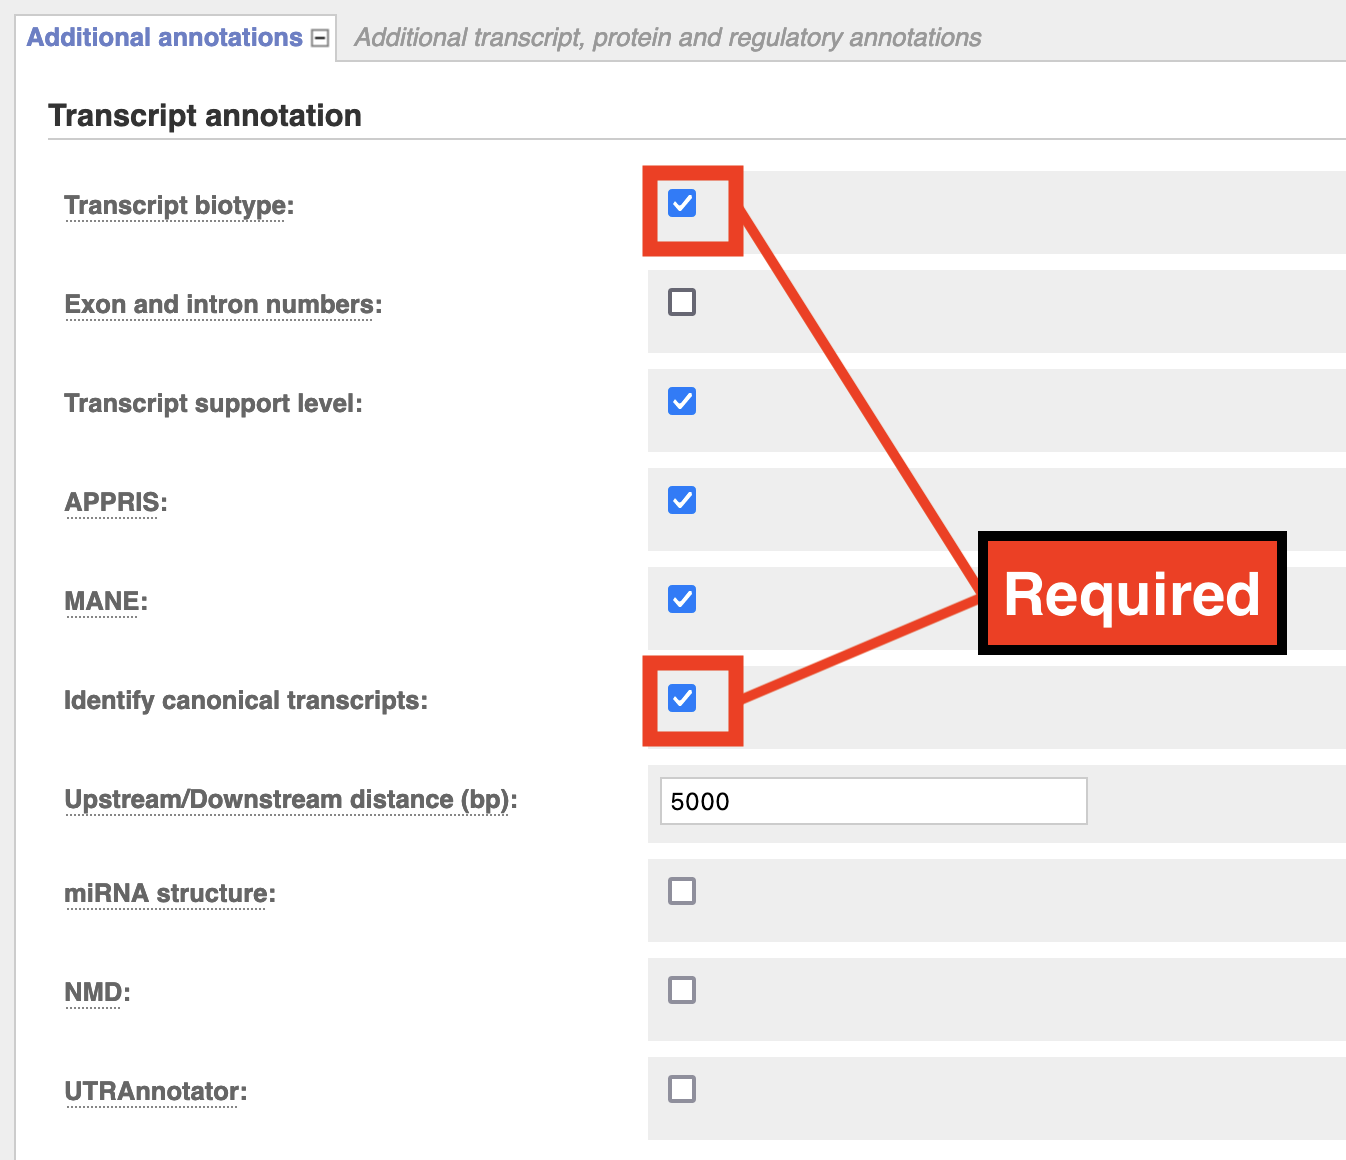
Additional Annotations > Transcript Annotation: Check Transcript Biotype & Identify Canonical Transcripts
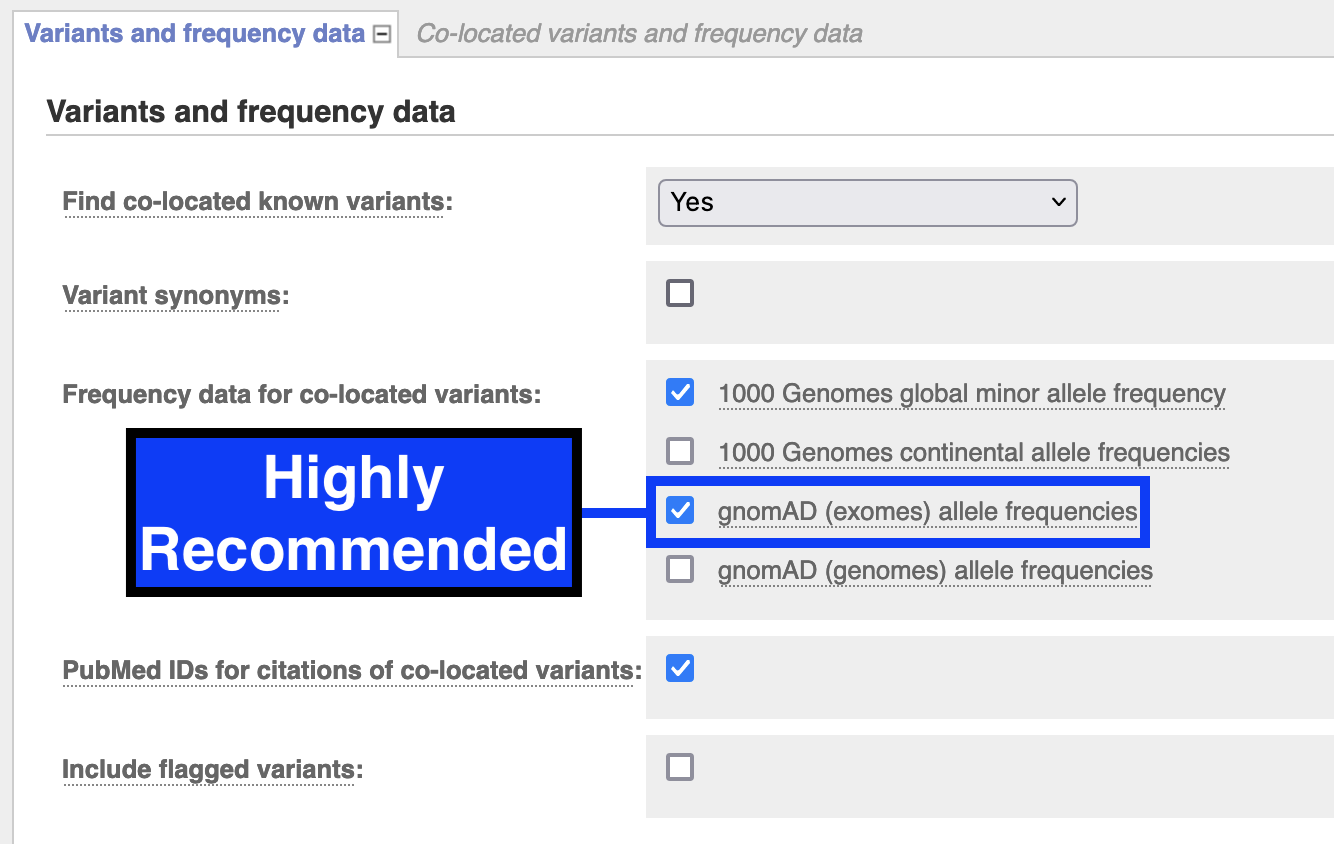
Variants and Frequency Data: check gnomAD (exomes) allele frequencies
Run VEP and download results as VCF

Repeat for each VCF in your cohort
Data Dictionaries
A collection of data dictionaries for various filetypes
(MAF) Valid Variant Classifications
Frame_Shift_Del |
Frame_Shift_Ins |
In_Frame_Del |
In_Frame_Ins |
Missense_Mutation |
Nonsense_Mutation |
Silent |
Splice_Site |
Translation_Start_Site |
Nonstop_Mutation |